Manage Users
- Add and Amend users, amend access levels and change/reset passwords
18/10/16 - Ref A1209
Those with System Administration rights within Job Tracker can add and delete users, manage the access levels of other users and change/ reset passwords. - Start by clicking on Control Panel. - In the top left click the Security / Users tab, then click Manage Users. - On the left hand side, you will see a list of all the users that are currently programmed into the system. - To modify an existing user, to start with simply double click on their name.
PASSWORD RESET If want to reset the password because the user has forgotten it or for security reasons, follow the simple steps above then click in the password box and type the new password.
Re key the new password in the confirm password field.
Once you're happy with your changes, click on "Save User" at the bottom left.
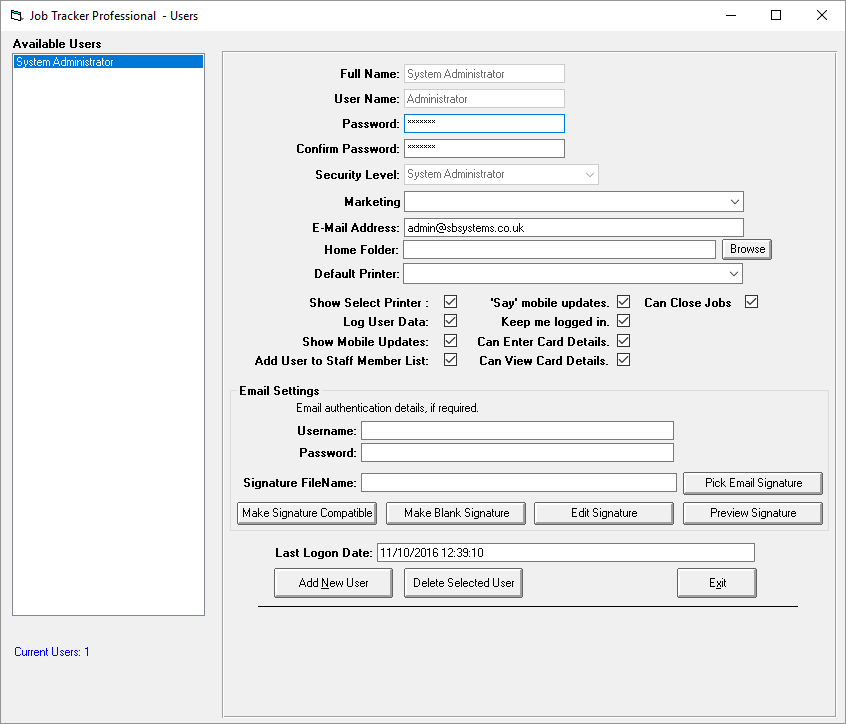
ADD A NEW USER or CHANGE ACCESS LEVELS FOR EXISTING USERS If you'd like to add a new user, click the "Add New User" button towards the bottom of the screen, and fill in the boxes. If it is an existing user that you wish to adjust access levels for, simply double click on their name in the list on the left of the screen. For all users, the core details that are needed are
- Full Name
- The User Name, this is the name they're going to log into Job Tracker with. It is case sensitive. - Set the security level required. There are five different security groups built into Job Tracker, and we can basically slot our users into one of those groups. The permissions assigned to those groups can be managed under 'Control Panel', Security / Users.
Fill in the remainder of the fields as appropriate. Most are self-explanatory. A few are explained in more depth below. Once you're happy you've entered or amended all the details correctly and assigned the correct access levels, click 'Save User' towards the bottom of the screen.
If this is a new user, their details will now appear on the left hand side of the screen.
Explanation of the settings available
The Home Folder is a handy short cut to get to a specific folder on your network or on the local computer. For example, you might have a networked scanner that scans PDF documents into a certain folder on your network. We can program up a button that means whenever we press is it, it'll open up that particular folder for you then you can Drag N Drop those PDF documents directly into Job Tracker, so if when you click on Browse, it'll give access to the local filing system and you can just go and pick a folder and allocate that. Default Printer. Click on the down arrow at the far left of the field and you will see a list of all the printers available to you. Select the appropriate printer. The Show Select Printer means whenever you go to print it'll show you the printers properties before it actually prints. Show Mobile Updates If the user has Job tracker Mobile this enables a window to float on screen so whenever your mobile engineers make any kind of updates the details will appear. Add User To Staff Member List If you tick this box, the users details will automatically appear in the staff member section where you program up your engineers and other staff members. Say Mobile Updates again if using Job Tracker Mobile, audio updates will be provided. Job Tracker will talk and it'll say "Bobs updated Job 1234" Keep Me logged In, if this is ticked, after one initial successful sign in, Job Tracker will log the user in automatically each time without needing the user name or password to be manually entered.
If you do want to stop this function for any reason, ie if you're going on holiday or want to enforce manual password entry, simply untick this field. You will then need to log out - click on File at the top of the screen and select "Log Me Out".
Can Enter Card Details and Can View Card Details, Job Tracker has the ability to securely collect credit card details and store credit card details,
ticking these options allows you to specify who has what level of access to this data.
To minimise fraud, most companies would set this up so that the users can collect card details but never be able to view them again.